
From Maple Leaves to Stunning Powder Room
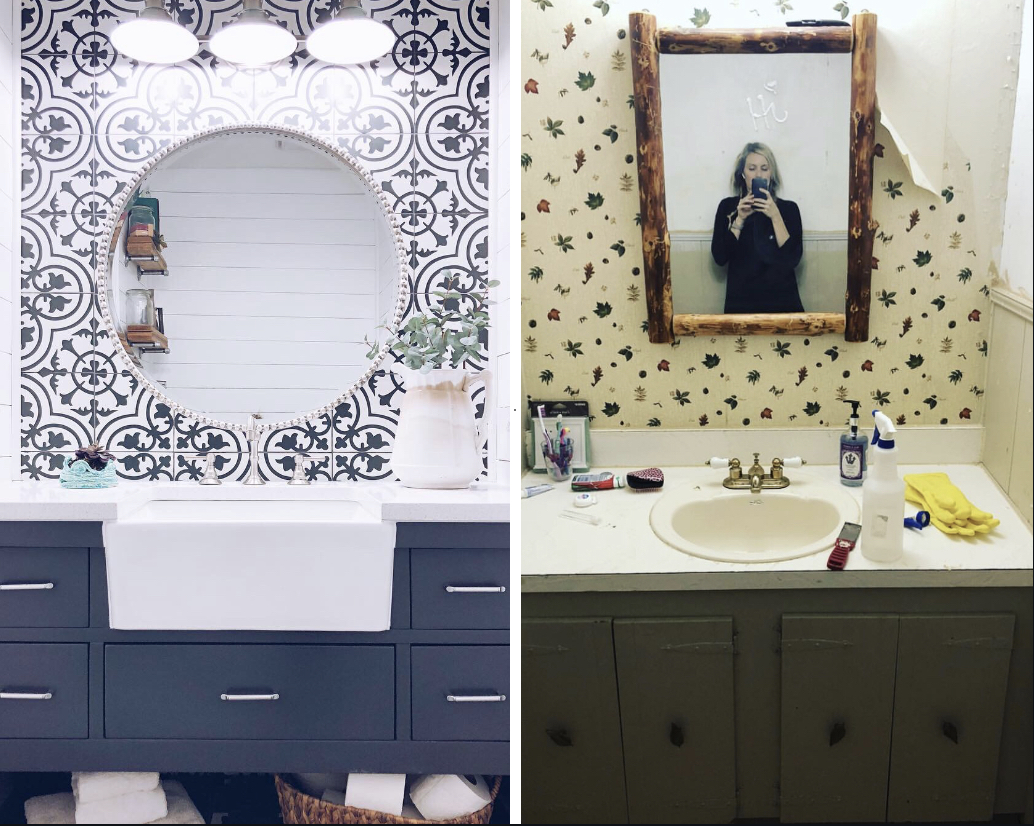
As you can, see this bathroom was AMAZING! Who doesn’t love a rustic themed bathroom, with educational wallpaper informing you of all the different tree leaves and their names? This is probably my biggest DIY renovation project to date but, I knew as soon as I saw this bathroom that this was going to be one of the first things I needed to tackle in our new home.  I couldn’t wait to get started! The first thing that had to go was of course…the wallpaper!!! Removing all the wallpaper was a very long tedious job. I read a bunch of tutorials on how to do this. There is a few different ways, everyone claimed to have the magic answer, but in reality removing wallpaper SUCKS!!! End of subject!! What worked best for me was to spray the wallpaper with a mixture of dish soap and water (about a Tablespoon of dish soap and the rest water). Then let the water sit on the wall until it was almost dry and use my handy paint scrapper and just start scraping. Sometimes I was lucky and got big sections, sometimes not so much and got little chips…ugh!! It all just depends how much adhesive is under that wallpaper. I actually was super lucky and
  removed one layer of wallpaper only to find another one under it…WHY???
Once all the wallpaper was outta there, I realized I wanted all of the paneling gone as well. So out that went, too. I used a small crowbar and hammer to remove it. I started with the top trim, then the baseboards and finally the wall paneling. It was actually super easy to do this step, just watch out for all those nails.
Next step to tackle was the Vanity and Sink. Don’t forget to turn off the water!!! Once the water is off, disconnect the water supply lines and remove the P-Trap. This is a whole blog in itself. Next bathroom I do, I will make a video!! I started with the vanity doors since those were easy to remove and that allowed me to really get behind the sink.  Then I looked for any screws that were holding the vanity into place. There were 4, two in the back and two on the sides. I used my crowbar to remove the backsplash and my scrapper to remove all of the old caulking and sealing. Once all of that was gone, it was time remove the sink and countertop. Once again, I used my handy crowbar and hammer and wiggled it completely loose. I need an extra set of hands to get it completely out of the bathroom. That sucker was super heavy, so I recruited my poor mom. LOL! Getting the rest of the vanity out was actually very easy and I even got to let out some aggression and kick things. Win win for all!! Now the bathroom all gutted and ready for some magic to happen to it.
With the paneling all gone and the wallpaper all removed the walls didn’t look their best. Instead of patching everything, sanding, priming and so on I went to my  favorite go to wall cover…Shiplap. This is my 3rd time Shiplapping an area, so I am a self-proclaimed Shiplap professional. I will make a step-by-step tutorial on making your own super cheap Shiplap wall really soon. With the Shiplap up on 3 of the 4 walls, I primed and painted the walls.

I knew I wanted an accent wall in this bathroom to help open the room up. This is a small powder room so I wanted something to really standout, so I decided on a tile accent wall. I tiled the vanity wall from ceiling to floor. I found this amazing tile at Home Depot and the price was amazing! First, I measured and re-measured my wall and all the tile over and over again to make sure I had it just right. I didn’t want to make a cut on the top tile so it was a little tricky and that last tile going in definitely gave me a run for my money.  The tile was fairly large and heavy – 8X8. I had to use lots of adhesive to make sure they stayed in place. I also added screws to the top pieces above the piping for extra stability. I’m not quite sure thats the right thing to do but, it worked amazing and everything stayed completely in its place.
Once the vanity was removed, I realized that no one had ever put flooring under it. That would be unexpected problem #500! 😉 I had tongue and grove hardwood flooring in the bathroom, making it nearly impossible to add additional flooring to the old planks. New floors for me!! No one liked those floors anyways…Don’t tell Greg! (thats my husband, he doesn’t appreciate any unexpected expense…good thing he was on a deployment during this whole renovation.)
I decided to go with the same pergo flooring that is in my living room and dining room. What I have started to learned from renovating is that everything seems to be a giant snowball effect. I start with one small project…”I’ll just replace the vanity!” which really means “I’m going to go ahead and redo the whole main floor…thanks!” As you can see, the bathroom floor replacement, turned into the entryway and hallway floor replacement as well. Whoops!! Only two more rooms to go now until all the floors in the whole house match!! Removing hardwood floors is no joke, doable but way more labor intensive then I was originally thinking. I got a price quote to sand and refinish all the hardwood to match the gray pergo, price wise it was actually pretty comparable. So, I went with the floors that I liked, which was the gray pergo.

After I had all the floors in and walls all finished up, it was time to add back in all the fixtures. I started with the toilet because lets be serious that was the thing everyone in the family missed the most. For some reason going up a flight of stairs was incredible hard for everyone. Next was the vanity sink which had been sitting patiently in the center of my living room for way too long. People stated to think it was a new piece of furniture. This vanity is super cool and has a drawer on the bottom that has the pipe area already cut out so it was easy to install.
 Last and final thing in the bathroom makeover is all the details…My favorite!! I added a brass nickel mirror, light fixture, towel ring and toilet paper holder to match the vanity fixtures. Up went the cute wooden sign from Hobby Lobby. I finished it off with three Cigar Mold Shelves that I made. You can read the tutorial on how to make those here. After the cigar molds were all up, I added a few of my favorite things. Read more about staging shelves here.
All in all somehow this bathroom turned out even better then I could have ever imagined. I’m not normally impressed with too many things that I do, but this one turned out pretty amazing!! I can’t wait to tackle my other two bathrooms in my house now. This one room made the biggest difference in my home. It added so much to the main floor of the house and even though it’s a small bathroom it really is a big eye catcher in the BEST way. Hope this inspires others to have the confidence in DIY projects in their homes.

Happy DIYing!!!

About The Author
Jessie
Related Posts

Jeffrey Court All-Star Challenge Reveal
Did you blink? That’s how fast the Jeffrey Court All-Star Challenge went by…
July 8, 2020
Week 5 ~ Let’s Get Tiling
Okay…so I’m having flashbacks of my last Jeffrey Court Challenge! Just like last…
July 1, 20204 COMMENTS
Leave A Comment
Stef F | 1st Oct 18
Hi. What paint color did you use for the shiplap?
admin | 1st Oct 18
Hi…I used Benjamin Moore’s Chantilly Lace in Pearl Finish! 😉
Kim | 4th Oct 18
You did such an amazing job! It looks fabulous.
admin | 19th Oct 18
Thanks so much!!