
The Power of the Pillow ~ DIY 10 Minute Pillow Tutorial
Life changing topics on our blog today…Pillow Talk…LOL! So if you haven’t figured it out by now…I am obsessed with pillows and adding them to all decor spaces. If you were to ask me what you could do to update your space quickly and cheaply, my first response would always be pillows. Well maybe, pillows and paint…but that’s a whole other blog post 😉
Do you walk into HomeGoods and see the 500 pillows and just run scared from the sight? So overwhelmed you don’t even have the slightest idea where to start. You think…ugh I’ll just keep those pillows the couch came with, they don’t look that bad. Stop Running!!! Seriously, these comfy little guys can really make or break your space and could be that key element you have been looking for to transform that space that is just ehhh to AMAZING!
You might be running, but I am rubbing my head all over those 500 pillows…talk about bringing Joy, that’s what pillows do for me!! So I thought I would share a few simple tips for how to choose and arrange your throw pillows. Fabric is key, but so is size and arrangement.
#1 ~ HOW TO ARRANGE PILLOWS ON A SECTIONAL
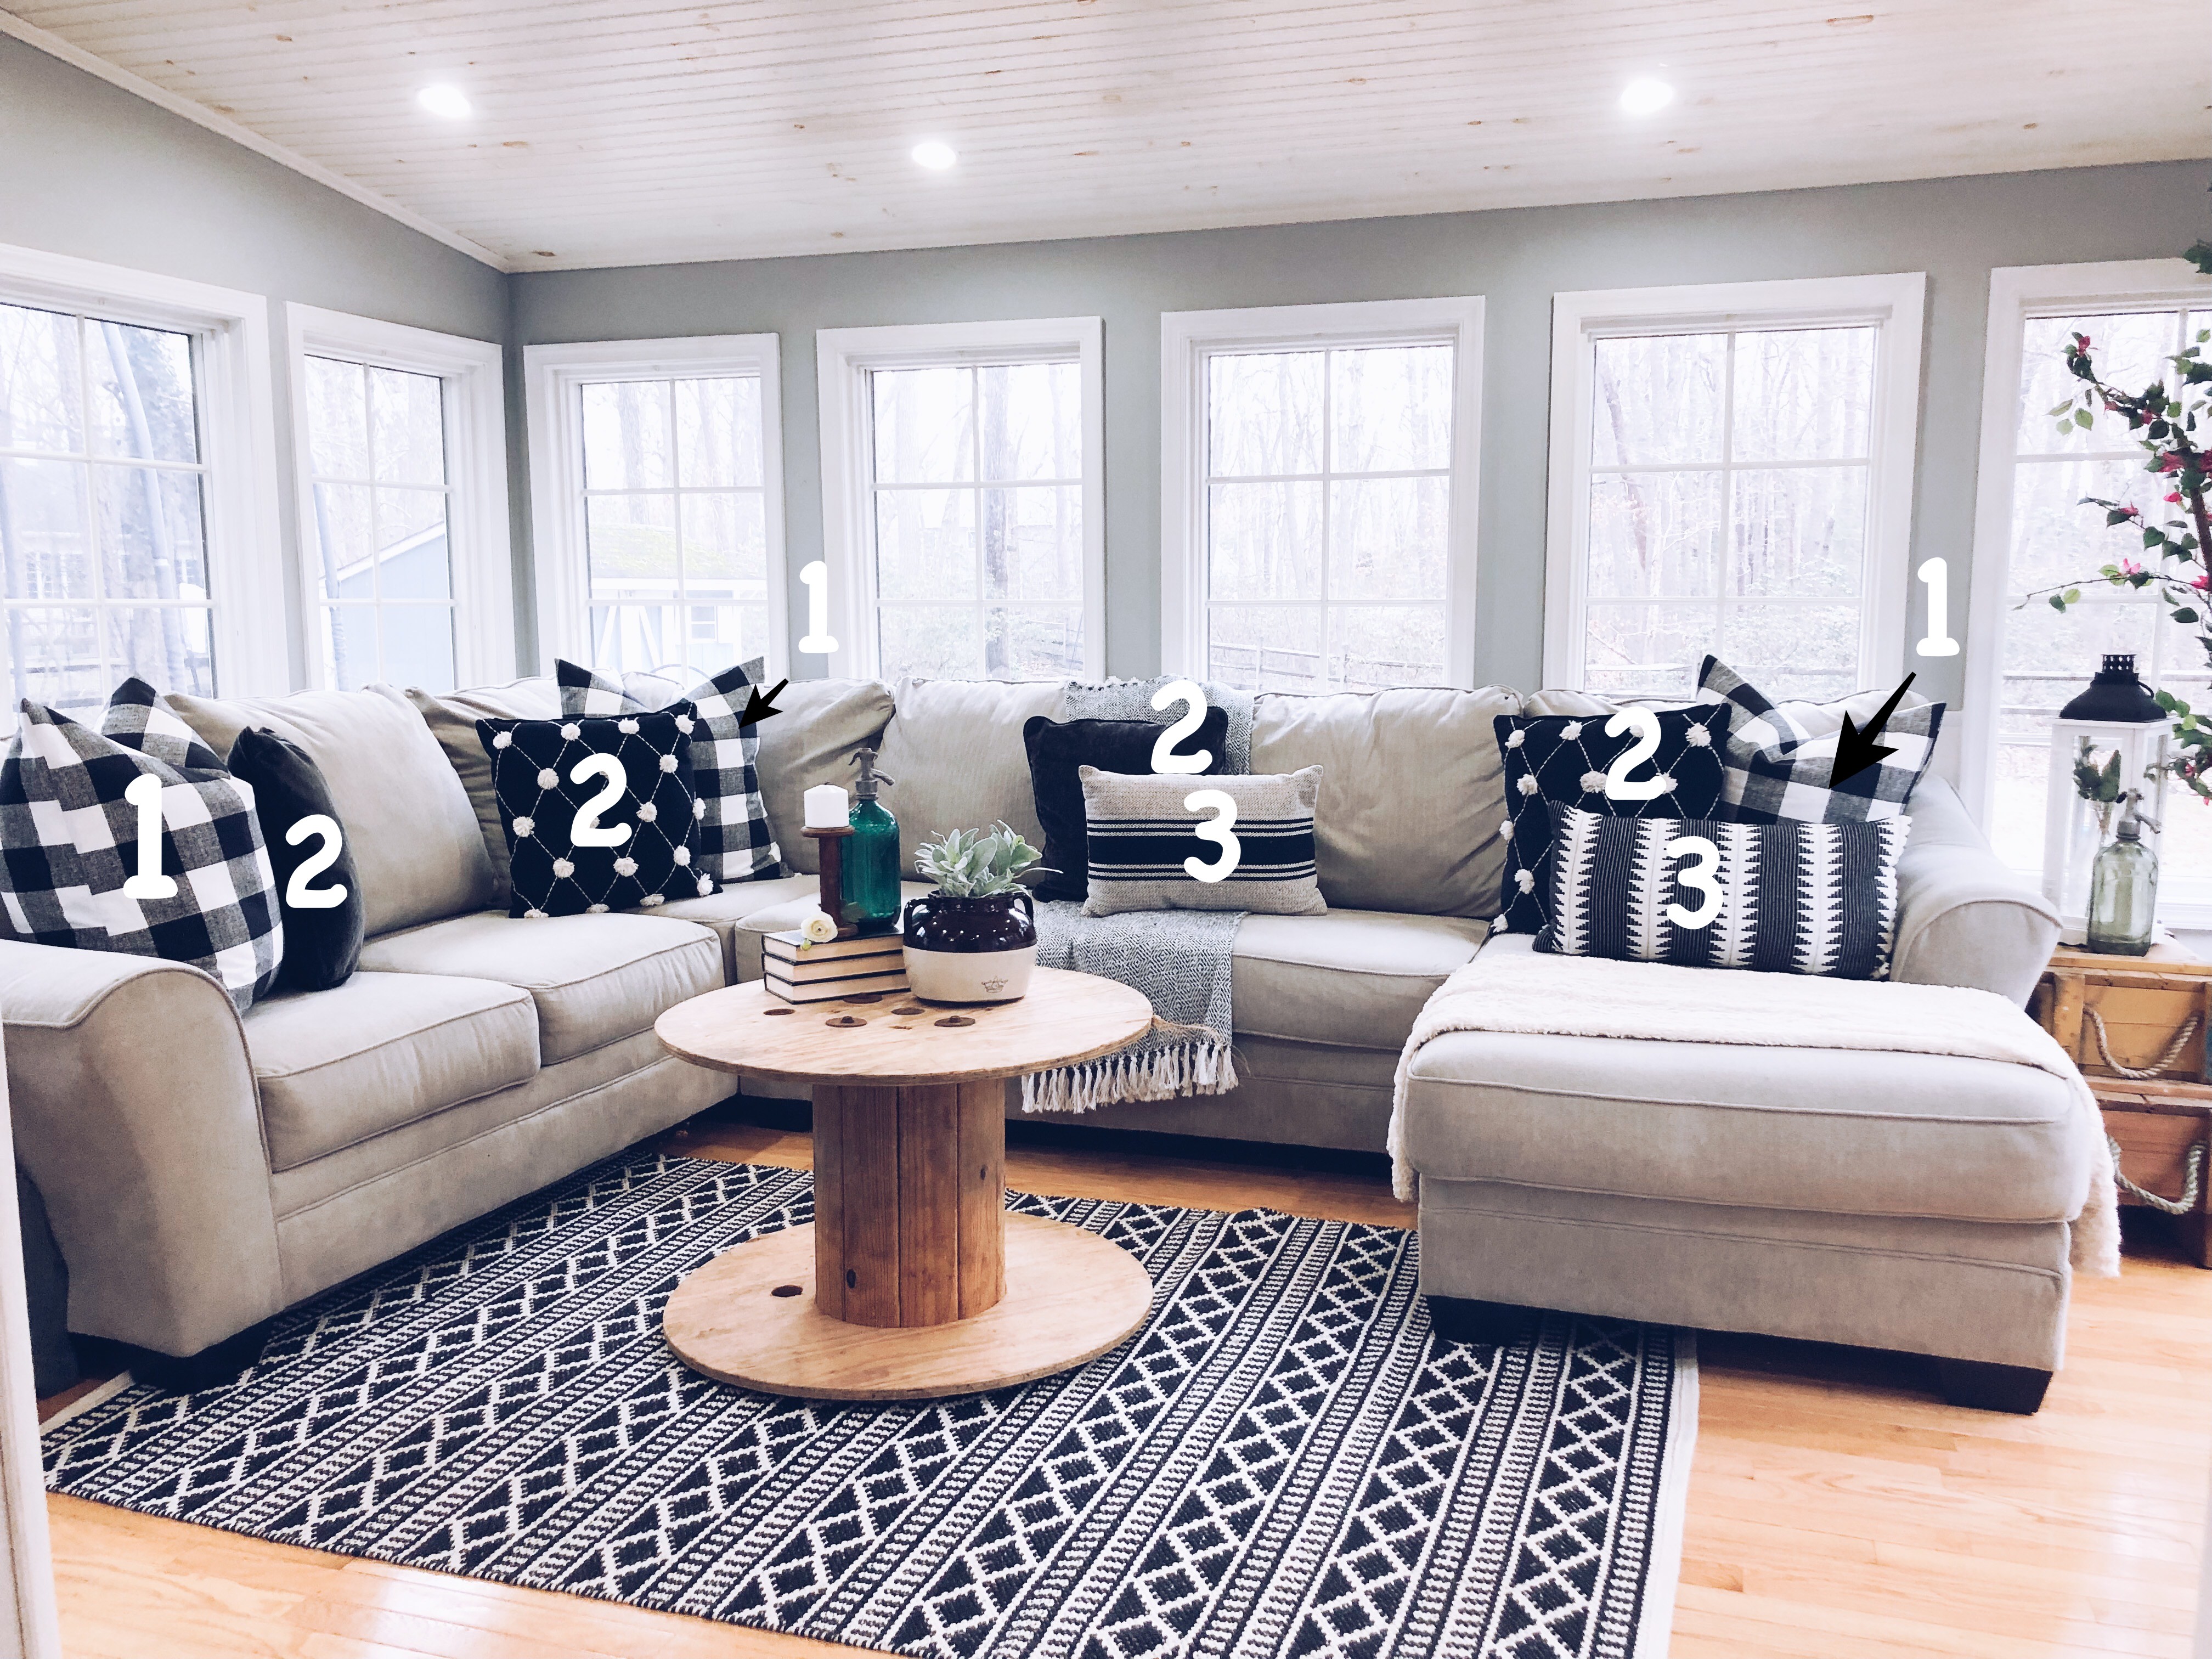
If you follow our blog, you would know 3 is my magic number. I like to group things in 3’s. This applies to pillows as well, odd numbers are visually more appealing. There are a variety of ways to style your pillows; the goal for me is it looks chic, clean and welcoming. Remember there is no right or wrong way to arrange your pillows…this is just what works best for me. For a sectional or sofa I always start at the ends with 24″ or 22″ pillows to anchor the space and add balance. Next I layer smaller pillows in front by adding two 20″ pillows in front of the other pillows, for texture. For the center of a sectional I add one 24″ pillow in center and one 20″ pillow or one lumbar pillow. For empty spaces in the sectional that I feel need an extra boost I use one 20″ pillow and add one lumbar or different shape pillow in front.

#1 ~ 24″or 22″ Pillows with Large Scale Pattern
#2 ~ 20″ Pillows with Solid or Small Scale Pattern
#3 ~ Lumbar Pillows with Solid or Small Scale Pattern


#2 ~ CHOOSING FABRIC AND PATTERNS
This is my favorite part…I love mixing fabrics and textures for all throw pillows! I start with a color scheme, choosing a lead pattern is a great way to get started and motivated in styling your throw pillows. Try to keep it all in the family most of the time. I do this by using the same color throughout the variety of patterns. I choose 2 patterns that complement each other. If I use more then 2 patterns I normally stick with one color. To mix and match combine textured pillows with solid color pillows. For my larger anchor pillows I often use a large scale pattern. I use a small scale pattern for front layering pillows. Mixing pattern scales is one of the most important things when choosing throw pillows. Using the same scale pattern is not going to give you the look you are trying to achieve!


#3 ~ CHOP OR NOT???
I’m totally obsessed with chopping my pillows! Something about chopping them makes me so happy, I obviously have some built up aggression and this must help because I am a chopping fool. I could chop pillows all day and often do because lets be serious, pillows never stay in place! The best is watching my kids or hubby trying to get all the pillows arranged and seeing them chopping, too. To chop or to not is a personal preference, once again no right or wrong way. This is what mine look like both ways…You choose!!


#4 ~ WHERE TO BUY PILLOWS
I see throw pillows everywhere these days, my favorite go to places are HomeGoods, Nordstrom, Kirkland’s, Pottery Barn and Target. HomeGoods always has the biggest selection which I love and they are always bring in new styles, they are normally the most affordable as well. Nordstrom, Pottery Barn and Kirkland’s have some awesome finds and if you can wait it out they normally go on sale at some point…Win!! Etsy also has a huge section to choose from and offers Designer Fabrics. For me, my go to spot is my own personal sweat shop. Pillows are actual one of the easiest things to sew for beginner sewers.
#5 WHAT TO USE TO MAKE YOUR OWN PILLOWS
All these pillows add up so quickly. I of all people get this. Each throw pillow is normally $25- $30. So why not make your own!

Tips for making your own pillows:
Wonder why all those model homes and store fronts pillows look so perfect? There inserts are larger then the actual pillows, by 2″. So when choosing your inserts go bigger, 20″ pillow cover use a 22″ insert, 24″ pillow cover use a 26″ insert…So simple and makes the biggest impact!
When choosing your insert, not all inserts are created equal! Polyester inserts are going to give you that nice full upright decorative look, but I don’t know about you things just can’t look pretty in my house. They have to withstand real life, which includes 3 kiddos all over them and more importantly my 4th child, my husband who just loves to get all up on EVERY single pillow just to really get me cringing! 😉 So Polyester will work if just for purely decorative like top pillow on Bedding or in a basket for decor. So for my sectional I use down/feather filled inserts all the way. My favorite ones are from Ikea, they are so cheap and do the trick every time!
My favorite On-Line fabric shops are Hawthornethreads.com and Fabric.com, Fabric.com offers coupons and Hawthorne Threads just has the most amazing fabrics to choose from I just can’t resist their patterns and you can get all the patterns in any type of fabric. For pillows I always go with Canvas, for the durability.

DIY ~ 10 MINUTE PILLOWS FOR BEGINNERS
(Seriously 10 Minutes…Let’s Do This)
This DIY Pillow cover tutorial is for an 24″ X 24″ pillow.
Supplies:
- Fabric of your choice
- Pillow insert
- Basic Sewing Machine
- Iron
- Scissors or Rotary Cutter
- Fabric Tape Measure or Transparent Ruler
This pillow cover only requires four straight sewing lines. You can get way more fancy if you want, but this is quick, easy and great for beginners.
Start by laying your fabric out.
You want to cut your fabric into a rectangle.
Measurements for any size pillow:
- Height ~ Add 1″ for the seam allowance.
- Width~ Multiply the width X 2 and add 5″ for overlap.
Mine was 25″ height and 53″ wide for 24″ pillow.


With the wrong side fabric up fold the edges over on each side 1/4″ + 3/4″ and iron them down into place. Stitch across the hem line on both sides.

Fold the left and right side of fabric together, crossing over each other making an overlay of the fabric.

I used my measuring ruler to make sure it ended up at 24″. For this tutorial you only need to sew four straight lines. Pin the overlay into place. Stitch across the upper and lower edges 1/2″.


Turn your cushion cover inside out and boom you are done. Iron it for a nice finished look…everything looks better without wrinkles! 😉

Happy DIYing!

Related Products:
This post contains affiliate links. As always, all opinions are our own. Shopping affiliated links helps support our small brand at no additional cost to you, we appreciate the love. For more information, please see our privacy policy. Thank you!
About The Author
Jessie
Related Posts

DIY Leather Pulls with Cricut
This post is in partnership with Cricut, a company I love. All opinions here are…
June 18, 2021
Creating with Sugru
This post is sponsored with thanks to Sugru, but all thoughts and opinions like always…
December 2, 2020