
DIY Modern Barn Door
Today I’m going to share with you my DIY Barn Door for under $75! If you have been following along you would know that I am trying to redo my whole house, one room at a time. This door is the final thing to finish off my sitting-room. When we moved in the door going into the basement opened into our main living space. Originally, I took the doors off the hinges for the movers on our moving day because it kept getting in the way. Once it was off, I knew it was never going back on. A Barn Door would be the best option for that space. I kept looking at them and all I could see was dollar signs, which don’t really bother me, but they sure do bother my hubby…hehe! A DIY Barn Door seemed like the obvious choice!
DIY Barn Door
Supplies:
- Sheet of Plywood -Pine
- 1″ X 6″ boards -3
- 1″ X 4″ boards-2
- 1″ X 2″ boards- 12
- Nail Gun
- Miter Saw
- Speed Square
- Gorilla Glue
- Sander
- Paint
To begin building the Barn Door, I started with a 4 X 8 sheet of pine plywood that I purchased at Home Depot.  This was the main cost of my project. My door frame going into the basement is 36″ wide X 83″ tall, that’s including all of my trim work. I had the wonderful men at Home Depot once again do some cutting for me. One day I will have my very own table saw! 😉 I had them cut my plywood down to 41″ wide and 85″ tall, giving me 3″ overlay on each side of my door frame and 2″ overlay above my door frame. This way when the door was completely closed you wouldn’t see any of my trim and I wanted it to be a little bigger so it would have a more dramatic look.

The plywood was the main base of my door, so I sanded it well on both sides. First I framed out the door adding 1 X 4’s around the side edges of the door and I used a 1 X 6 for the middle of the door.
When picking out all your boards make sure to check them all carefully, a lot of them are warped and not straight which will mess up the whole look of your project. I cut two long 1 X 4 ‘s to 85″ and three 1 X 6 boards were cut at 33″. I started with the 1 X 4 adding gorilla glue along the back and placing it on top of the plywood, making sure all the edges aligned and clamped them into place. With my nail gun I nailed the 1 X 4’s into place. I repeated these steps with my 1 X 6’s.
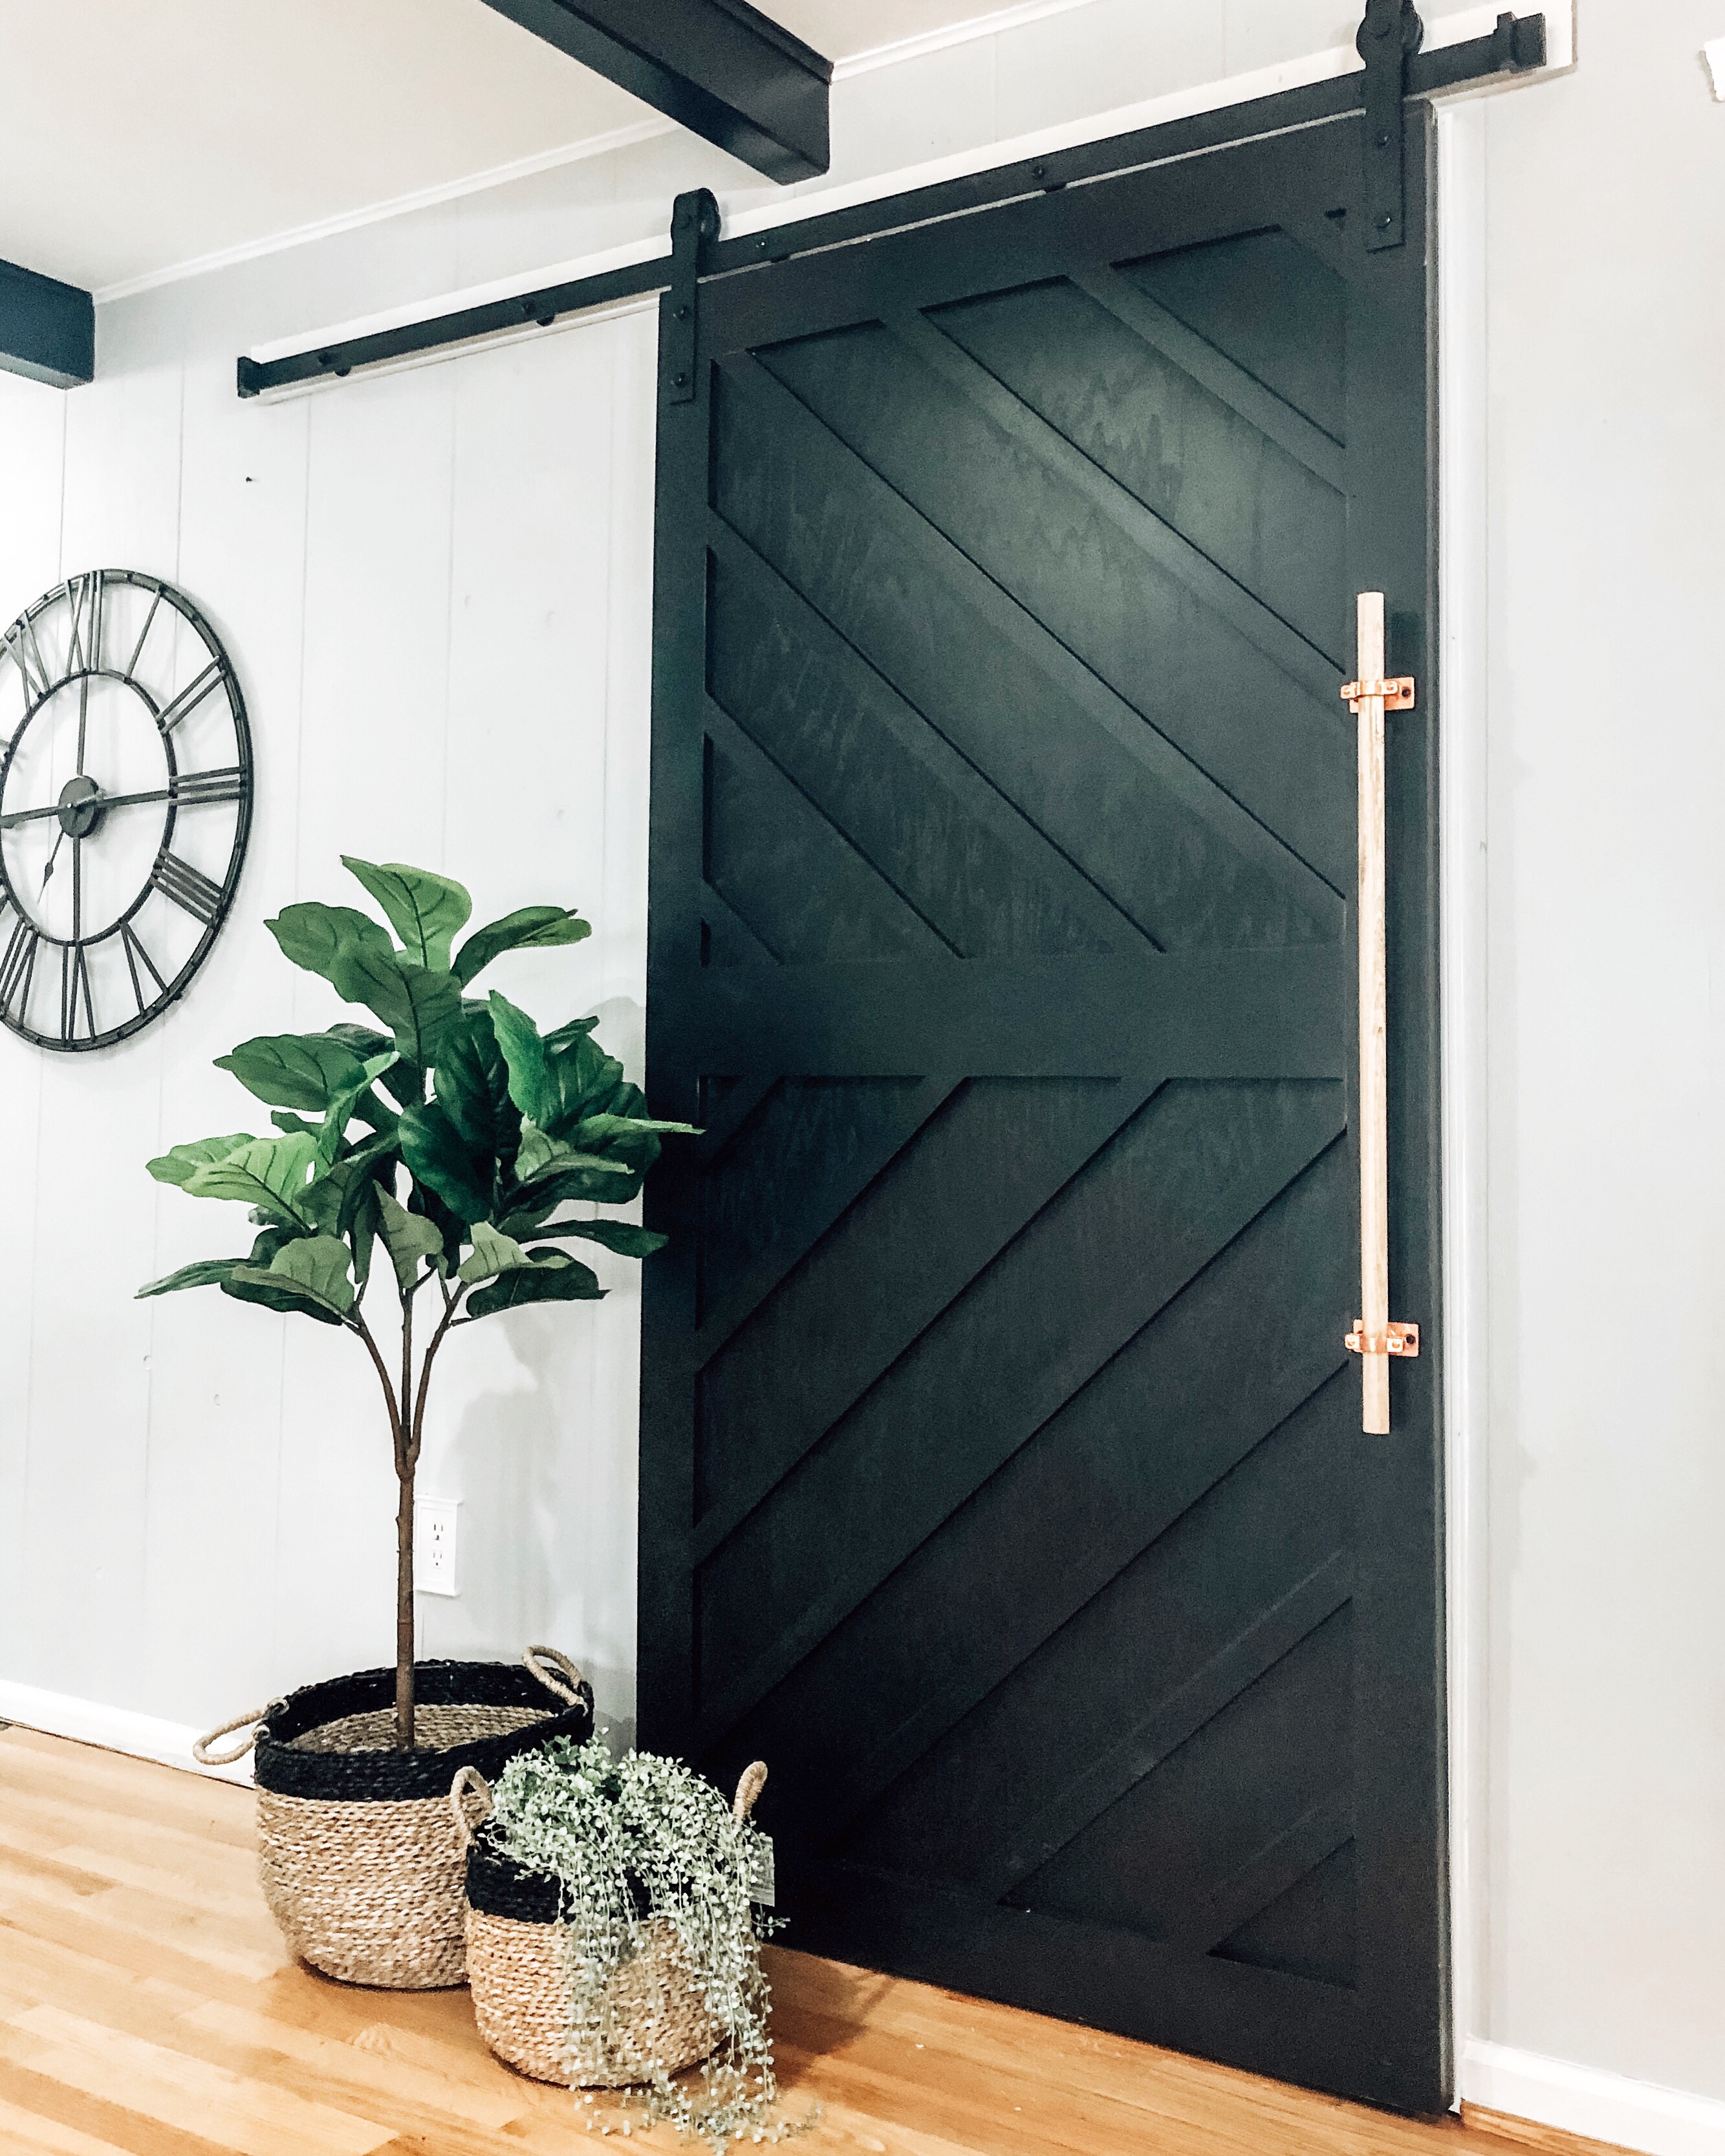
Once my door was framed out, I moved onto the center design. Originally, I had planned on doing an X across the bottom of the door. The more I thought about it, the more I wanted to do something more original and a little more Modern. So I decided on this design plan:
For this design, I used 12 – 1″ X 2″s and placed them in the location, I used a scrap piece of 1 X 6 for my spacer and guided between each board. I started with the board that hit the center 1 X 6 and worked my way out and below.

I marked each board at the angle it hit the outside frame using my speed square making sure that all the boards lined up level and even with it’s parallel board. Then used my nail gun to nail each board into place.

After all the boards where nailed in, I filled in all my nail holes and gaps with Wood Filler. I like to use the Color-Changing wood filler, so I can make sure I don’t miss anything.

After the wood filler was all dry I gave my door a good sanding.


After I was done sanding, it was time to start painting. I had a hard time deciding on what direction to go for this, stain, paint – white or black? I ended up choosing Paint and used Sherwin Williams paint in Black Magic to do the door.

The first coat I did by hand to really get in all the corners. The second coat I used my Paint Sprayer, which I love for big projects. It gives it a perfect smooth finish.

I let the door dry for a few days, before hanging it up…Let’s be serious maybe it was a month! I ordered a 6ft sliding barn door hardware from Amazon, that I am so happy with, so I will add that to the bottom of the post. Hanging the Barn Door is a whole other blog post!! I already have my next Barn Door that I want to make all picked out, so I will make a blog post for Hanging A Barn Door after I’m all done.


I know this is a DIY tutorial but, if you are looking for a similar pre-made sliding barn door I found this most amazing company. White Shanty is the largest sliding barn door manufacturer in America and they are located in Collegeville, PA. All of their doors are handmade in the USA which I absolutely love. They have so many different Modern Barn Door options and styles to choose from. They have a ton of unique designs that would be a really showstopper in your home. They even have Closet Barn Doors to choose from. You can even customise them as well. So if you aren’t up for making your own, this is also an incredible option for you. They even have one that is almost my exact same modern barn door pattern.

Related Products:
This post contains affiliate links. As always, all opinions are our own. Shopping affiliated links helps support our small brand at no additional cost to you, we appreciate the love. For more information, please see our privacy policy. Thank you!
About The Author
Jessie
Related Posts

Flooring Transformation with Novocore Flooring
This post is in partnership with Novocore Flooring, a brand & company I love. All opinions…
May 22, 2022
DIY Leather Pulls with Cricut
This post is in partnership with Cricut, a company I love. All opinions here are…
June 18, 20212 COMMENTS
Leave A Comment
Leslie Searles | 15th Mar 19
Love love the Barn door!!!! It looks great .
Have a great Day
??❤️
admin | 18th Mar 19
Thanks so much!!