
One Room Challenge -Week 4- All About the Accents
So, Week 4 of the One Room Challenge is all done….I don’t know how this keeps happening, but the weeks are just flying by. As we go into Week 5, I really cannot believe we only have two more weeks to go. Time to punch it into high gear now!
As always, it is so inspiring to see all the other guest participants designs and of course the featured designers, as well. Be sure to have a look on the One Room Challenge (ORC) Blog site to see all the amazing projects going on.

Let’s talk week 4 and everything that got accomplished! This week has been the craziest by far. My kids and hubby were off all week for Spring Break so we decided to go on a little vacay. Amazing, but also so stressful with everything that needed to get done this week. So, right before we left I pulled an all nighter and got so much done in the room. Let me be the first to say, this is not something you should try at home…FOR REAL, I am too old for this nonsense! What came from my hard-work was pretty amazing though.

First up, would be my accent ceiling…That’s right an Accent Ceiling!! Who needs an accent wall, when you can have an accent ceiling. So amazing! I am absolutely obsessed with how it turned out. It really is jaw-dropping when you see it in person. The pictures just don’t do it justice. Thank goodness…because it really almost took me down!

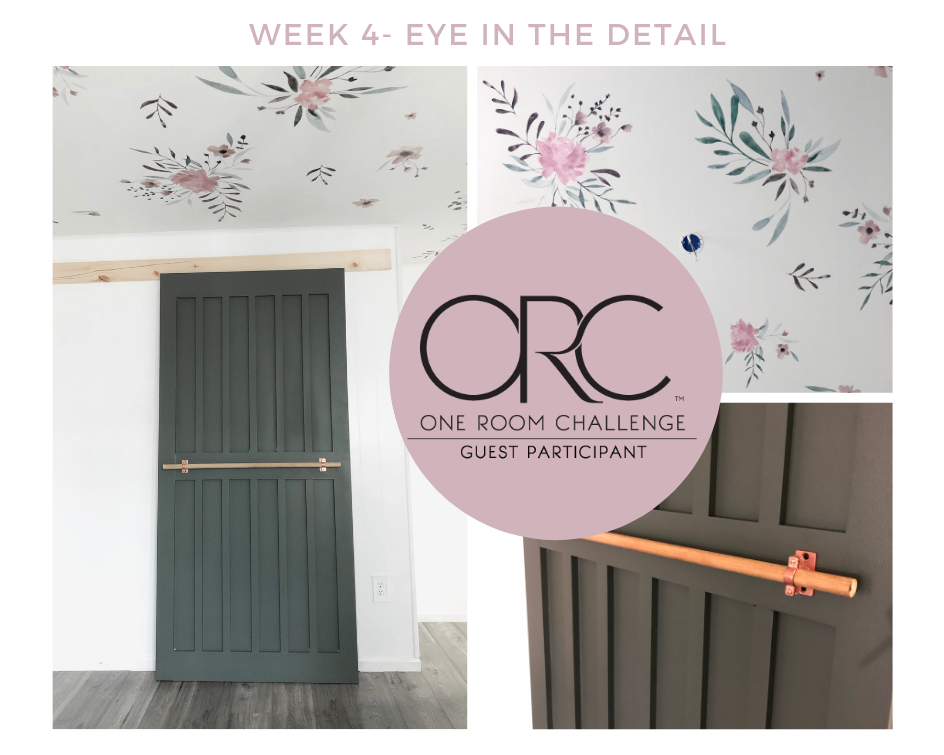
When I ordered this floral print from Pottery Barn, I actually thought it was wallpaper. To my surprise it was large decals that were watercolor prints, so beautiful. I guess reading the whole discription of things before you order them is something people do? I don’t know, I saw it and was completely sold at first glance…florals, watercolors, pastels, umm…yes please!
This however changed my design slightly. I wanted it to still appear like wallpaper, so I painted the ceiling a slight hint of green to flow with the florals and to separate it from the wall color. At first, I thought I went too light on the ceiling color, but once the built-ins were painted my accent green color it really pulled the green from the ceiling. Great news for me because I didn’t know if I really had another ceiling painting in me for this project.

First, I pulled all of my sheets of floral and laid them across the floor to completely see what I was working with. Once, they were all out I started figuring out the layout and design. I had a pretty good idea of what I wanted it to look like, I have been planning this room for quite sometime now.
I had to place each flower and leaf into the perfect position, remember by this time it was after midnight. Yikes…lol! I totally should have video taped this part of the project, if only someone could have seen how many times I got up and down that ladder moving flowers and leaves…a little to the left, a little to the right. After this project I am convinced I definitely have OCD. I positioned each floral and used an old credit card to flatten out all the bubbles and get it secure to the ceiling. Then I carefully removed the transfer tape making sure I didn’t rip any of the design. 

 This process was definitely long and tedious but, absolutely without a doubt beyond worth it. So, there you have it… an Accent Ceiling, check that right off my list. Now, if my light fixture would finally show up that would really help the cause!
So what could really compete with that amazing ceiling? Nothing…duh, but I have to say this Barn Door comes pretty close. Next up on my list was my DIY Barn Door. This is my second barn door that I have made. My last one was pretty recent and everything was still fresh in my brain and more importantly in my hands! ,) My oldest daughter informed me that I was getting super fast, she said it only took a day to make this door and my last one took a year. Umm…I always love a backhanded compliment…LOL! I added a step by step tutorial below for anyone interested in making their very own Barn Door. Super easy, super cheap and who doesn’t love a Barn Door!
For this door, I wanted a more clean modern look, so I choose to go with all straight lines, which ps…made things super easy as well. I painted it Sherwin Williams Pewter Green in the emerald satin finish. This is the same color I went with for my built-ins. I had about 50 paint chips to choose from and I got 8 sample paints. This color is really amazing. Its the perfect shade of green with hints of gray and blue.

DIY Barn Door
Supplies
- Sheet of Plywood -Birchwood
- 3 – 1″ X 6″ boards
- 2 – 1″ X 4″ boards
- 5 – 1″ X 2″ boards
- Nail Gun
- Miter Saw
- Speed Square
- Gorilla Glue
- Sander
- Paint
-
- Start with a 4 X 8 sheet of pine plywood that I purchased at Home Depot. Measure the door frame the barn door is covering, mine is 36″ wide X 83″ tall, that’s including all of my trim work. I had the wonderful men at Home Depot once again do some cutting for me. I had them cut my plywood down to 41″ wide and 85″ tall, giving me 3″ overlay on each side of my door frame and 2″ overlay above my door frame. This way when the door was completely closed you wouldn’t see any of my trim and I wanted it to be a little bigger so it would have a more dramatic look.
- Sand the plywood really well on both sides. Then frame out the door by adding 1 X 4’s around the side edges of the door and use a 1 X 6 for the middle of the door. Just a note: when picking out all your boards make sure to check them all carefully, a lot of them are warped and not straight which will mess up the whole look of your project.
- Next, cut two long 1 X 4 ‘s to 85″ and three 1 X 6 boards cut at 33″. I started with the 1 X 4 adding gorilla glue along the back and placing it on top of the plywood, making sure all the edges aligned and clamped them into place. With my nail gun I nailed the 1 X 4’s into place. I repeated these steps with my 1 X 6’s.

- Once my door was framed out, I moved onto the center design. My first barn door I went with a diagonal pattern, but thought I would do something a little different for this one. So I chose the straight line pattern below.
- For this design, I used 5 – 1″ X 2″s and placed them in the proper location. I centered the first board directly in the center of the door, from there I got super lucky and was able to space each board 4″ apart for one another. Then used my nail gun to nail each board into place.

- After all the boards where nailed in, I filled in all my nail holes and gaps with Wood Filler. I like to use the Color-Changing wood filler, so I can make sure I don’t miss anything. After the wood filler was all dry I gave my door a good sanding.

- After I was done sanding, it was time to start painting. First I primed the entire door. I use my Paint Sprayer, which I love for big projects, such as doors. It gives it a perfect smooth finish.

I also added this DIY hardware handle. It’s made with plumber piping from Home Depot and a wooden dowel. Also, super easy, but is the perfect finishing touch. Remember, it really is all in the detail! 😉

So that’s it guys. So much…I know and still so much left to still do…2 weeks left…wish me luck! Thanks for following along. I love all the support!
Just a recap, because this is my favorite part of the blog post. So funny, because I cringed so much when I had to share these photos for the first time. Now, all I see is all the hard-work that has happened!
WEEK 1

Finished WEEK 4


About The Author
Jessie
Related Posts

Jeffrey Court All-Star Challenge Reveal
Did you blink? That’s how fast the Jeffrey Court All-Star Challenge went by…
July 8, 2020
Week 5 ~ Let’s Get Tiling
Okay…so I’m having flashbacks of my last Jeffrey Court Challenge! Just like last…
July 1, 20208 COMMENTS
Leave A Comment
Gina M | 25th Apr 19
This is turning out beautiful! I can’t wait to see the finished room.
admin | 28th Apr 19
Thanks so much Gina!! I can’t wait to see how it turns out too! Thanks for following along with us during this adventure!
Terri | 26th Apr 19
That ceiling is beautiful! Bravo!
admin | 28th Apr 19
Thanks so much Terri! I am loving it so much too! Thanks for following along in our adventure!
Lorinda Walters | 29th Apr 19
The room is beautiful! I love the ceiling, the door, the color of the floors! You are so talented! Thank you for sharing your beautiful art with us!
Libbie | 29th Apr 19
This is GORGEOUS! Loving those wall decals.
Kathy Walters | 29th Apr 19
Love the ceiling good job
admin | 10th May 19
Thank you so much Kathy! The ceiling is my favorite!!!